
(macOS)[python] pyserial을 이용한 Arduino UNO R3 제어 with vscode - 1/2
Intro
OS : MacOS, Monterey, v12.6
HW : Arduino UNO R3 board
SW : Visual Studio Code, so-called vscode
python : 3.10.7
arduino board setting with vscode in macOS
python library pyserial을 이용한 arduino serial 통신
1. Arduino Board Setting & Error Solutions
2. Arduino : Initialize, Serial, Verify, Upload
Requirements
vscode
arduino-cli : brew install arduino-cli
vscode extensions
Arduino
C/C++ or C/C++ Extension Pack
options : arduino-snippets
python library
pyserial : pip3 install pyserial
1. arduino HW device 확인
arduino board를 usb에 연결 후 terminal로 확인
$ ls -al /dev | grep tty.u
crw-rw-rw- 1 root wheel 0x9000002 10 14 14:36 tty.usbmodem142301
2. Arduino Board Setting with vscode
# 사용자 환경설정 및 Arduino Board 설정이 완료되었으면 3번 Arduino Initialize로 이동
project folder 만들기
py_ard_project
# arduino board initailize 시 파일명을 project 이름과 동일하게 py_ard_project.ino를 생성해야함
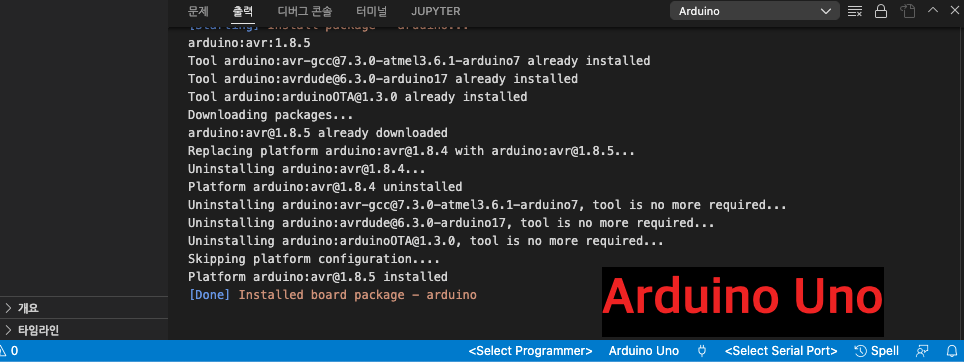
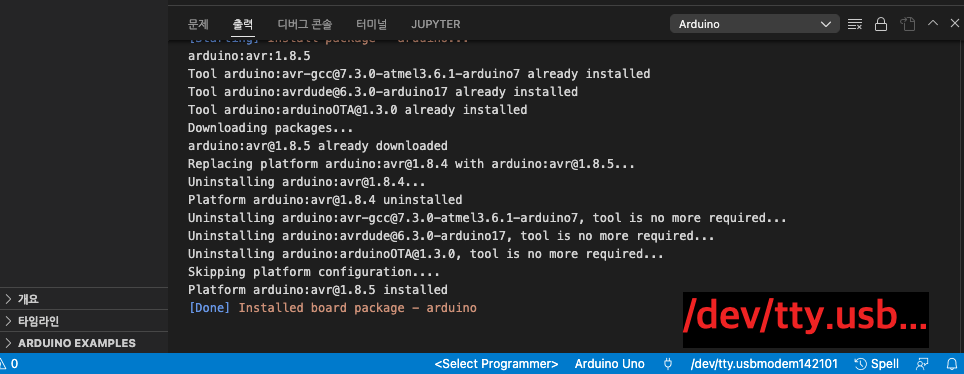
Arduino: Board Manager
command+shift+p : >Arduino: Board Manager
Type : Arduino
Arduino AVR Boards : Arduino UNO board .... 자신에게 맞는 아두이노 보드 선택 후 install

아래 출력 확인 : [Done] Installed board package - arduino
# 오류발생 참고: Arduino: Board Manager 오류 - 시작

Arduino: Board Manager를 재실행해도 같은 오류 발생 시 vscode 환경설정 진행
command palette : command+shift+p : >Preferences: Open User Settings
또는 아래와 같이 설정 찾아가기 : command + "," -> 사용자 -> Arduino configuration
# vscode "command palette" 단축키 command+shift+p 를 사용 추천
환경설정 방법은 2가지가 있다.
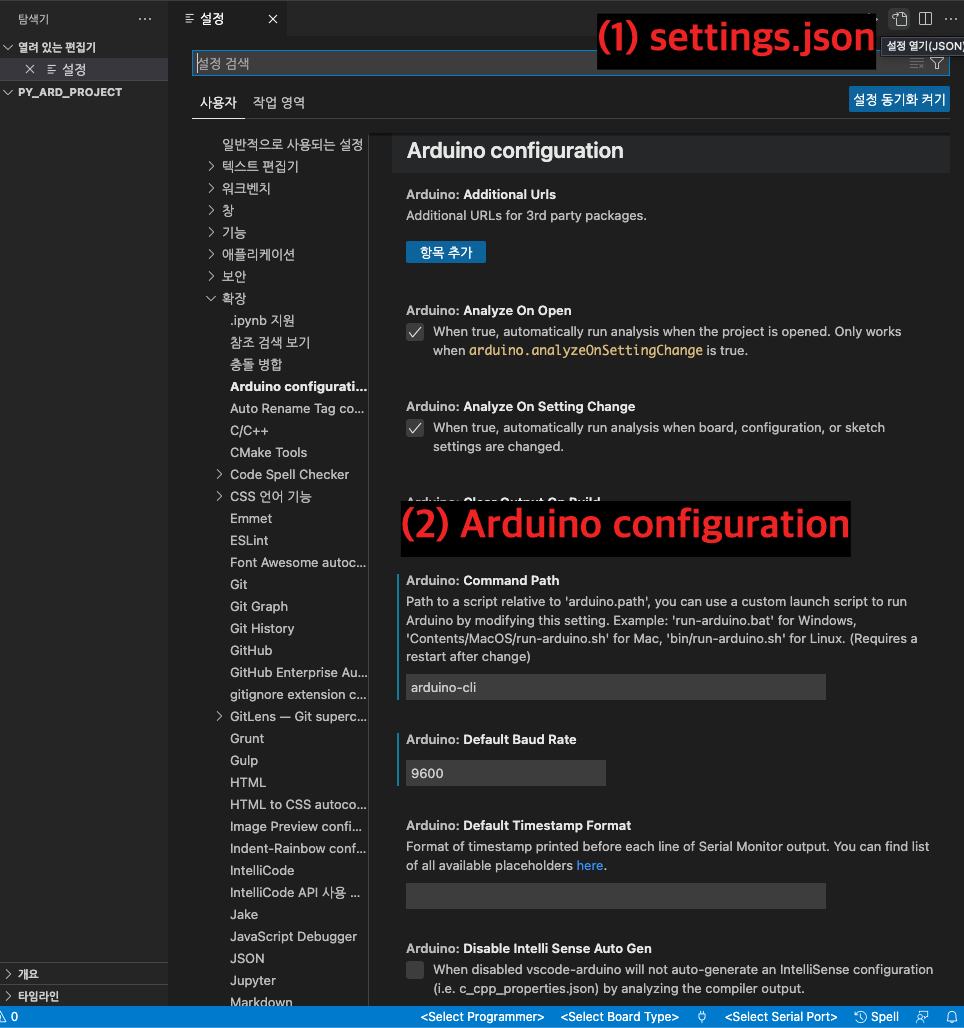
(1)우상단 설정열기(JSON) 아이콘을 클릭하여 settings.json을 직접 수정
arduino-cli commandPath를 이용
settings.json
{
    "arduino.commandPath": "arduino-cli",
    "arduino.defaultBaudRate": 9600,
    "arduino.path": "/usr/local/bin/",
    "arduino.useArduinoCli": true,
}
(2)Arduino configuration 항목별 설정하는 방법 : 직접 각 항목에 위 항목의 오른쪽 값을 넣거나 체크
# 오류발생 참고: Arduino: Board Manager 오류 - 끝
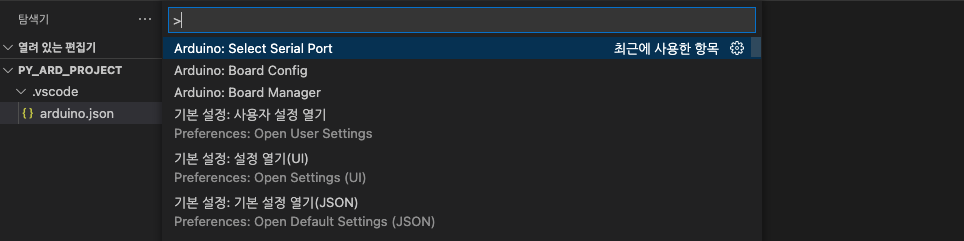
Arduino: Board Configuration
command+shift+p : >Arduino: Board Configuration

select board : Arduino Uno (Arduino AVR Boards)

하단 상태바(파란줄) : Arduino Uno 선택확인
Arduino: Select Serial Port
command+shift+p : >Arduino: Select Serial Port
3번째 usbmodem... 선택
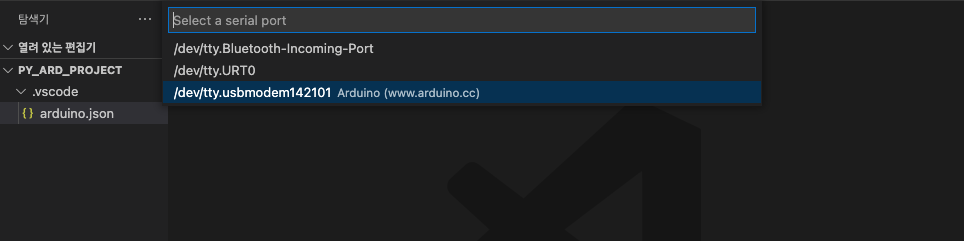
하단 상태바(파란줄) : serial port 연결 확인
Arduino: Open Serial Monitor
command+shift+p : >Arduino: Open Serial Monitor
또는 하단 상태바(파란줄) 플러그버튼 클릭
# Arduino UNO R3 : baudrate 9600

하단 상태바(파란줄) : 9600(baudrate) 연결 확인

지금까지 arduino board 설정
.vscode/arduino.json
{
    "board": "arduino:avr:uno",
    "port": "/dev/tty.usbmodem142101"
}
Arduino: Select Sketch
sketch 파일(.ino) : 폴더명과 .ino 파일명 동일하게, py_ard_project/py_ard_project.ino
py_ard_project.ino
// 초기값 설정 : inled의 13은 내장LED 번호, sw는 문자열로 표시
int inled = 13;
char sw = '1';

void setup() {
  // Serial.METHOD 형식, begin은 사용, 9600은 baud rate, pinMode 설정
  Serial.begin(9600);
  pinMode(inled, OUTPUT);
  // 동작 설명, Serial.println은 줄바꿈 포함
  Serial.println("Default number is declared by sw = '1' ");
  Serial.println(" '1' is Blink Mode every second for 5 times");
  Serial.println(" '2' is turning on for 5 seconds");
  Serial.println(" '0' is turned off & Serial shutdown");
  Serial.println(" Others are jsut turned off but Serial port on");
}

void loop() {
  // Serial.available은 serail 통신을 수신한 값으로 초기값이 0
  // 전송창에 signal이 입력되면 Serial.available은 1을 가지며 loop를 돈다.
  if(Serial.available() == 0){
    Serial.println("Ready to input number");
    // Serial input이 없을 때, 즉 Serial.available이 0일때 멈춤
    while(!Serial.available());
    Serial.println("");
  }

  // Serial.available이 0보다 크다는 건 입력값이 있을 때 다음 조건문을 실행하겠다는 의미
  if(Serial.available()>0){
    // if(sw가 1일때), 전송창에 입력되는 값을 sw에 저장
    sw = Serial.read();
    if(sw == '1'){
      //if(조건){}else if(조건){}else{} 형태로 else는 if, else if외의 조건
      //if 안에 for 조건문, 반복 변수 i 선언, for(초기값; 조건식; 증감식) 형태로 표시
      int i;
      Serial.println("Blink Mode every a second");
      for(i=1; i<=5; i++){
        Serial.print(" i = : ");
        Serial.println(i);
        digitalWrite(inled, HIGH);
        Serial.println("inled is on");
        delay(1000);
        digitalWrite(inled, LOW);
        Serial.println("inled is off");
        delay(1000);
      }
      Serial.println("----- Blink Mode End -----");
      Serial.println("");
    }
    else if(sw == '2'){
      int j;
      Serial.println("inled is Turning on for 5 seconds");
      digitalWrite(inled, HIGH);
      for(j=1; j<=5; j++){
        Serial.print(" j = : ");
        Serial.print(j);
        Serial.println(" sec");
        delay(1000);
      }
      Serial.println("----- Turn on Mode End -----");
      Serial.println("");
      digitalWrite(inled, LOW);
    }
    else if(sw == '0'){
      Serial.println("Turn off & Serial shutdown");
      digitalWrite(inled, LOW);
      // Serial.end() 실행 후 전송창에 입력된 값을 통신하지 않음
      Serial.end();
    }
    else{
      digitalWrite(inled, LOW);
    }
  }
}
build foler 만들기 : py_ard_project/build
.vscode/arduino.json 수정
.vscode/arduino.json
{
    "board": "arduino:avr:uno",
    "port": "/dev/tty.usbmodem142101",
    "sketch": "py_ard_project.ino",
    "output": "build"
}
command+shift+p : >Arduino: Select Sketch
.vscode 폴더에 c_cpp_properties.json 파일이 생성
build 폴더에 각종 폴더와 파일이 생성됨
Arduino sketch code verify
command+shift+p : >Arduino: Verify
또는 우측 상단 아이콘(Arduino: Verify) 버튼 클릭
-출력-
[Starting] Verifying sketch 'py_ard_project.ino'
Please see the build logs in output path: /Users/jiwonlee/persona/py_ard_project/build
IntelliSense configuration already up to date. To manually rebuild your IntelliSense configuration run "Cmd+Alt+I"
[Done] Verifying sketch 'py_ard_project.ino'
Arduino sketch code upload
command+shift+p : >Arduino: Upload
2편에 계속....